In the last episode, you got to know about:
- What is a web service?
- Two major ways of creating one.
- How SOAP web services work (with explanatory illustrations).
Now, it’s time to get your hands-on experience by creating a SOAP webservice all by yourself.
Let’s start with the simplest one. By creating the most basic example every tech noob has experienced with — Creating a simple calculator.
How to Create the Calculator?
Zero experience? No worries! This exercise will be a:
- Beginner friendly
- Step-by-Step guide
covering all the things without making you blind half the way.
What type of a calculator are we gonna create?
Very simple one. It only has the ability to add, subtract, multiply, and divide two integers. Nothing more! Nothing less!
What You’ll Need?
Before starting to work on our calculator, there are some things we need to prepare.
- A code editor (IntelliJ Idea Ultimate edition for me)
- Most basic understanding about Java classes and interfaces. (If you don’t know, you don’t come here).
- An internet connection?🤔
There are some other things as well. But we’ll talk about them along the way. Otherwise you will run🤣.
Calculator as a SOAP Web Service.
What you have to do is simple. Open your code editor. If you are going to do the exact thing, what I’m going to do, you can install IntelliJ IDEA Ultimate Edition.
Why the ultimate one? Because we’ll need it later when deploying the service on a server.
But it’s paid?
Yeah. But if you are a student, it’s FREE. Use your GitHub Student pack to get it for free.
If you don’t know how to get the GitHub Student Pack for FREE, follow this guide.
Let’s create the Calculator
Alright! Now you have all the things on your hand and ready to start your journey.
As the first step of every project, open your code editor and create a New project.
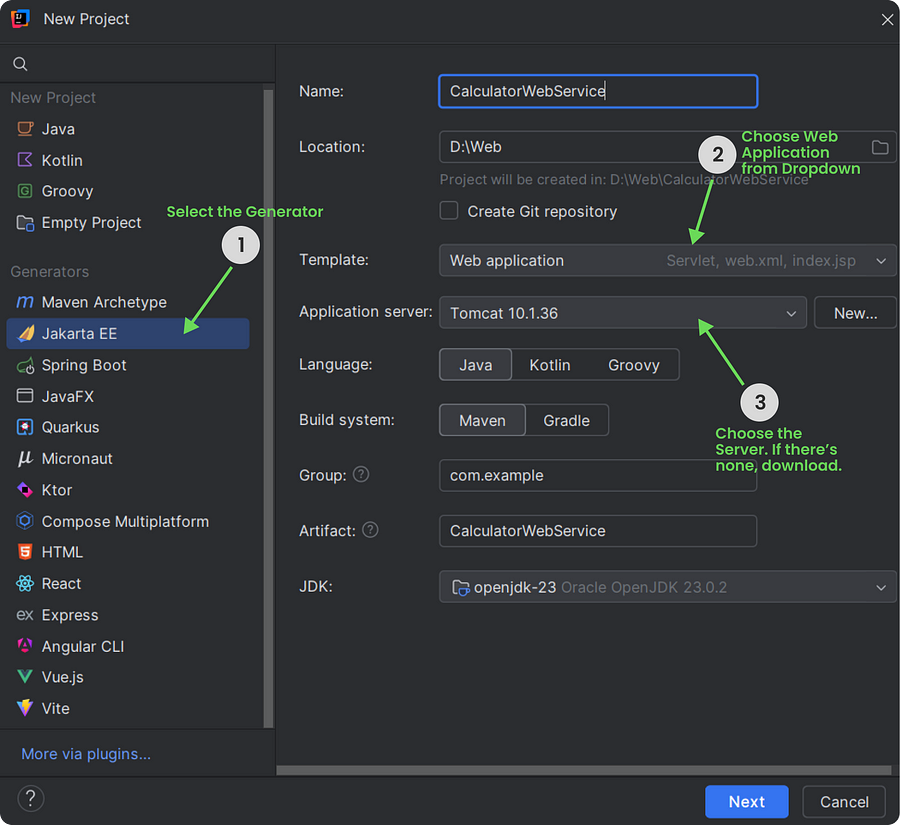
- Select “Jakarta EE” as the Generator from the list. If you don’t see the option, click on the “More via plugins” link and search for the term in the search bar.
- But you’ll need to have the Ultimate edition of this code editor I mentioned in the previous paragraph to make this enabled.
- Then, as usual, give a proper meaningful name to the name field and select a location to save your project.
- Moving on to the template section, choose the project to be a Web application from the drop-down.
- Give your attention to the next part carefully.
Selecting a Server to Deploy
We are going to deploy our project by initializing a server locally on our PC. There are many servers we can use to do that.
- Glass Fish Server
- Tomcat Server
are two of the best choices out there that we can use without any additional cost.
We are gonna use the Tomcat server for the deployment of our web service. So, choose it from the drop-down box.
If it’s not in the drop down (happens if you’re doing this for the first time), click on New > Tomcat Server (Not the TomEE Server).
Then you’ll see something like this:
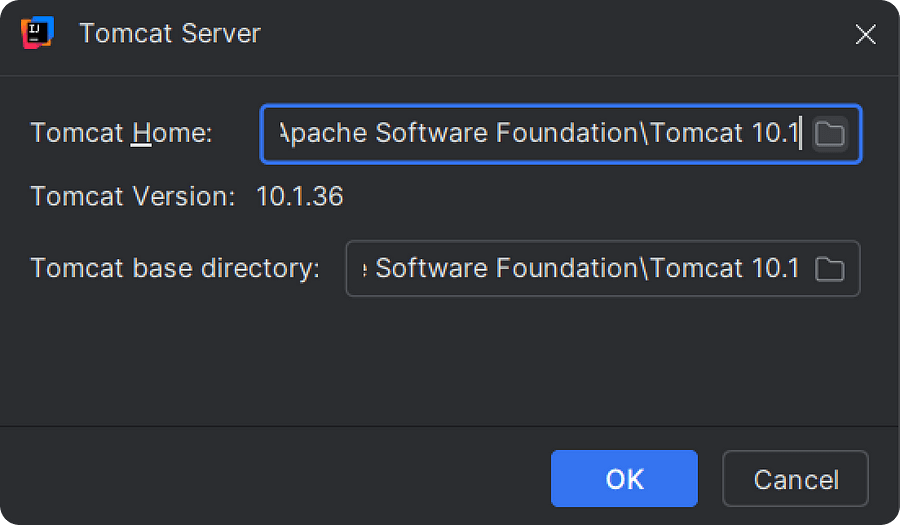
This means the Tomacat server is already installed on our computer — and we are good to go.
But what if that’s not the scenario, and you are getting this error as in the below screen shot I have taken? It means you don’t have the Tomcat server installed on your local PC.
So, you have to download it.

Let’s find out how to download and install it.
How to download and set up Tomcat Server Locally.
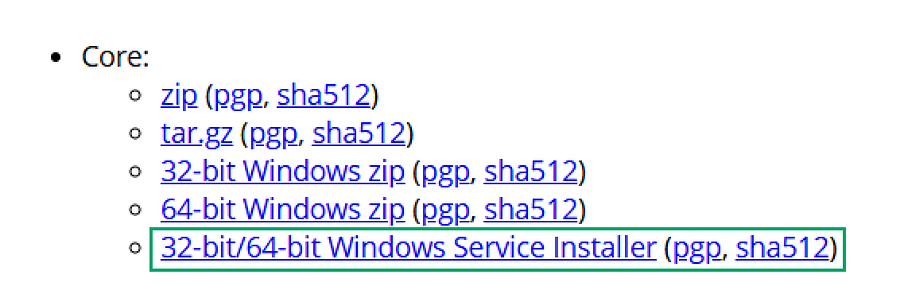
First, you’ll need to navigate to the Apache official website to download the server, which I will provide you the link below.
Once the setup is downloaded, install it by choosing the directory where you have installed Java.
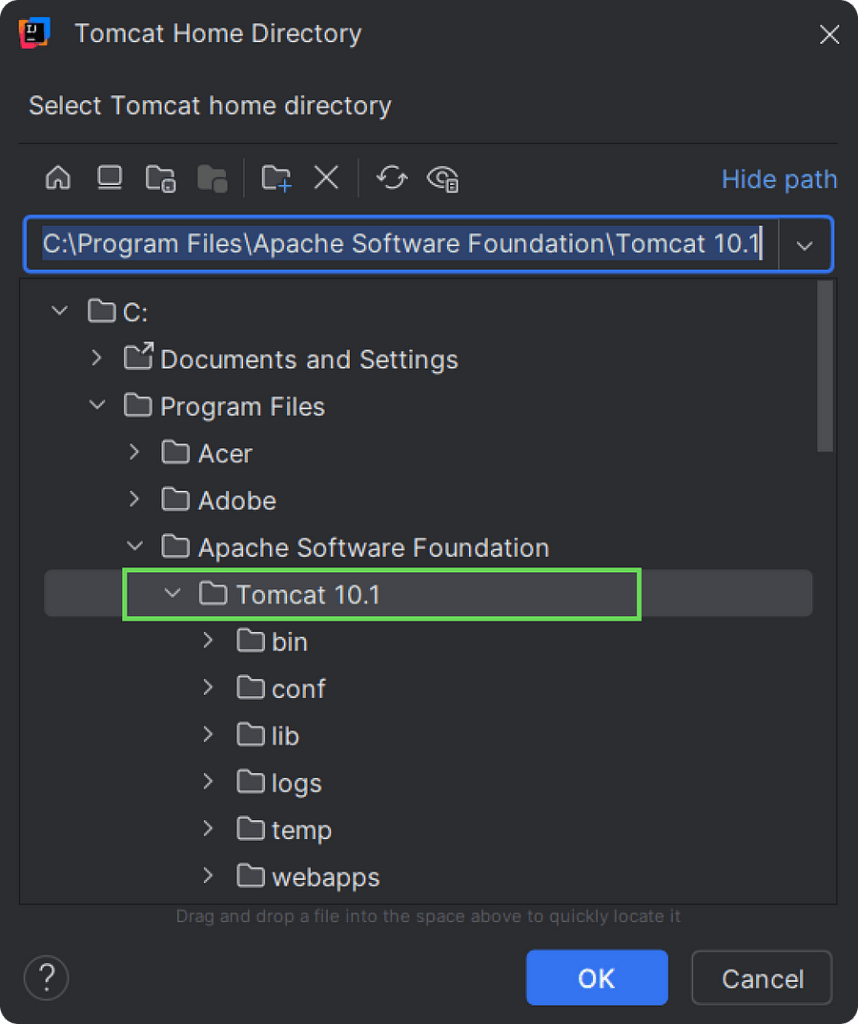
- Then you’ll see this document structure in the Program files.
- Click on it and click again on Tomcat <Version>.
- You’ll ask for “Administrator Privilege” to go inside. Click OK (it is essential to follow that. Otherwise, the server will not allow you to choose).

Once you’ve done all these steps, now you’ll be able to choose the Tomcat server like below — and then the error will be gone.
- Keep all the other settings as it is since we are going to use Mevan as the builder and it’s already the default one.
- Hit Next to open the dependency & plugins installer.
- The only dependency you can install is “Servlet” and it’s already ticked out. So we are not gonna touch anything there.
- Hit on Create.
The Project Structure
With everything we have done, now it’s the best time to think about how we are going to finish this one and get some output. If something comes at all. Isn’t it?
Let’s be simple. First it needs a Class with some methods to do the calculations, right? But it would be more of a thing if we added an interface first and then implement it within a class.
Why? I would say to keep the code more maintainable and easier to update whenever we need.
You could argue on that and go with your pace, and I’m not gonna kill you for that. Keeping that in mind, let’s create our interface.
CalculatorWebService.java
package com.example.calculatorservice;

import jakarta.jws.WebMethod;
import jakarta.jws.WebService;

@WebService
public interface CalculatorWebService {

    @WebMethod
    public int add(int number1, int number2);

    @WebMethod
    public int subtract(int number1, int number2);

}
Activity for you: 📖
Here I have added two methods for addition and subtraction. Go ahead and create the remaining two methods for multiplication and division.
When creating the interface, you would see some dependencies are needed to continue. They will either import and install it themselves or you could have to do it manually. I will show you how to do it manually.
- Open the project structure and click on the pom.xml file.
- There will be a section
<dependencies></dependencies>to add any dependency we’ll need for the project. - Add the following inside it.
1. jakarta.jws
See those annotations @webService &@webMethod . They enable JAX-WS (Jakarta XML — Web Service) to generate a WSDL document and to mark a method, class, or interface as a SOAP web service operation respectively.
To make those annotations work as intended, ‘jakarta.jws-api’ is needed to be installed.
<dependency>
     <groupId>jakarta.jws</groupId>
     <artifactId>jakarta.jws-api</artifactId>
     <version>3.0.0</version>
</dependency>
2. axws-ri
Next, to make this a SOAP web service by providing JAX-WS runtime to enable SOAP functionality, another dependency called axws-ri will be needed.
Here’s how you add it.
<dependency>
     <groupId>com.sun.xml.ws</groupId>
     <artifactId>jaxws-ri</artifactId>
     <version>4.0.0</version>
     <type>pom</type>
</dependency>
3. jakarta.servlet-api
Finally, to deploy the web service in our local web server — Tomcat Server — jakarta.servlet-api needs to be installed.
<dependency>
     <groupId>jakarta.servlet</groupId>
     <artifactId>jakarta.servlet-api</artifactId>
     <version>5.0.0</version>
     <scope>provided</scope>
</dependency>
Now, if the dependency section looks like this, we are all set to go.
Dependencies
<dependencies>
        <!-- Needed for running servlets in a web container
        (Tomcat, GlassFish, etc.).-->
        <dependency>
            <groupId>jakarta.servlet</groupId>
            <artifactId>jakarta.servlet-api</artifactId>
            <version>5.0.0</version>
            <scope>provided</scope>
        </dependency>

        <!-- Provides the @WebService and @WebMethod annotations.-->
        <dependency>
            <groupId>jakarta.jws</groupId>
            <artifactId>jakarta.jws-api</artifactId>
            <version>3.0.0</version>
        </dependency>

        <!-- Provides JAX-WS runtime to enable SOAP functionality. -->
        <dependency>
            <groupId>com.sun.xml.ws</groupId>
            <artifactId>jaxws-ri</artifactId>
            <version>4.0.0</version>
            <type>pom</type>
        </dependency>

</dependencies>